DIYables ESP32 Starter Kit
 Click to zoom
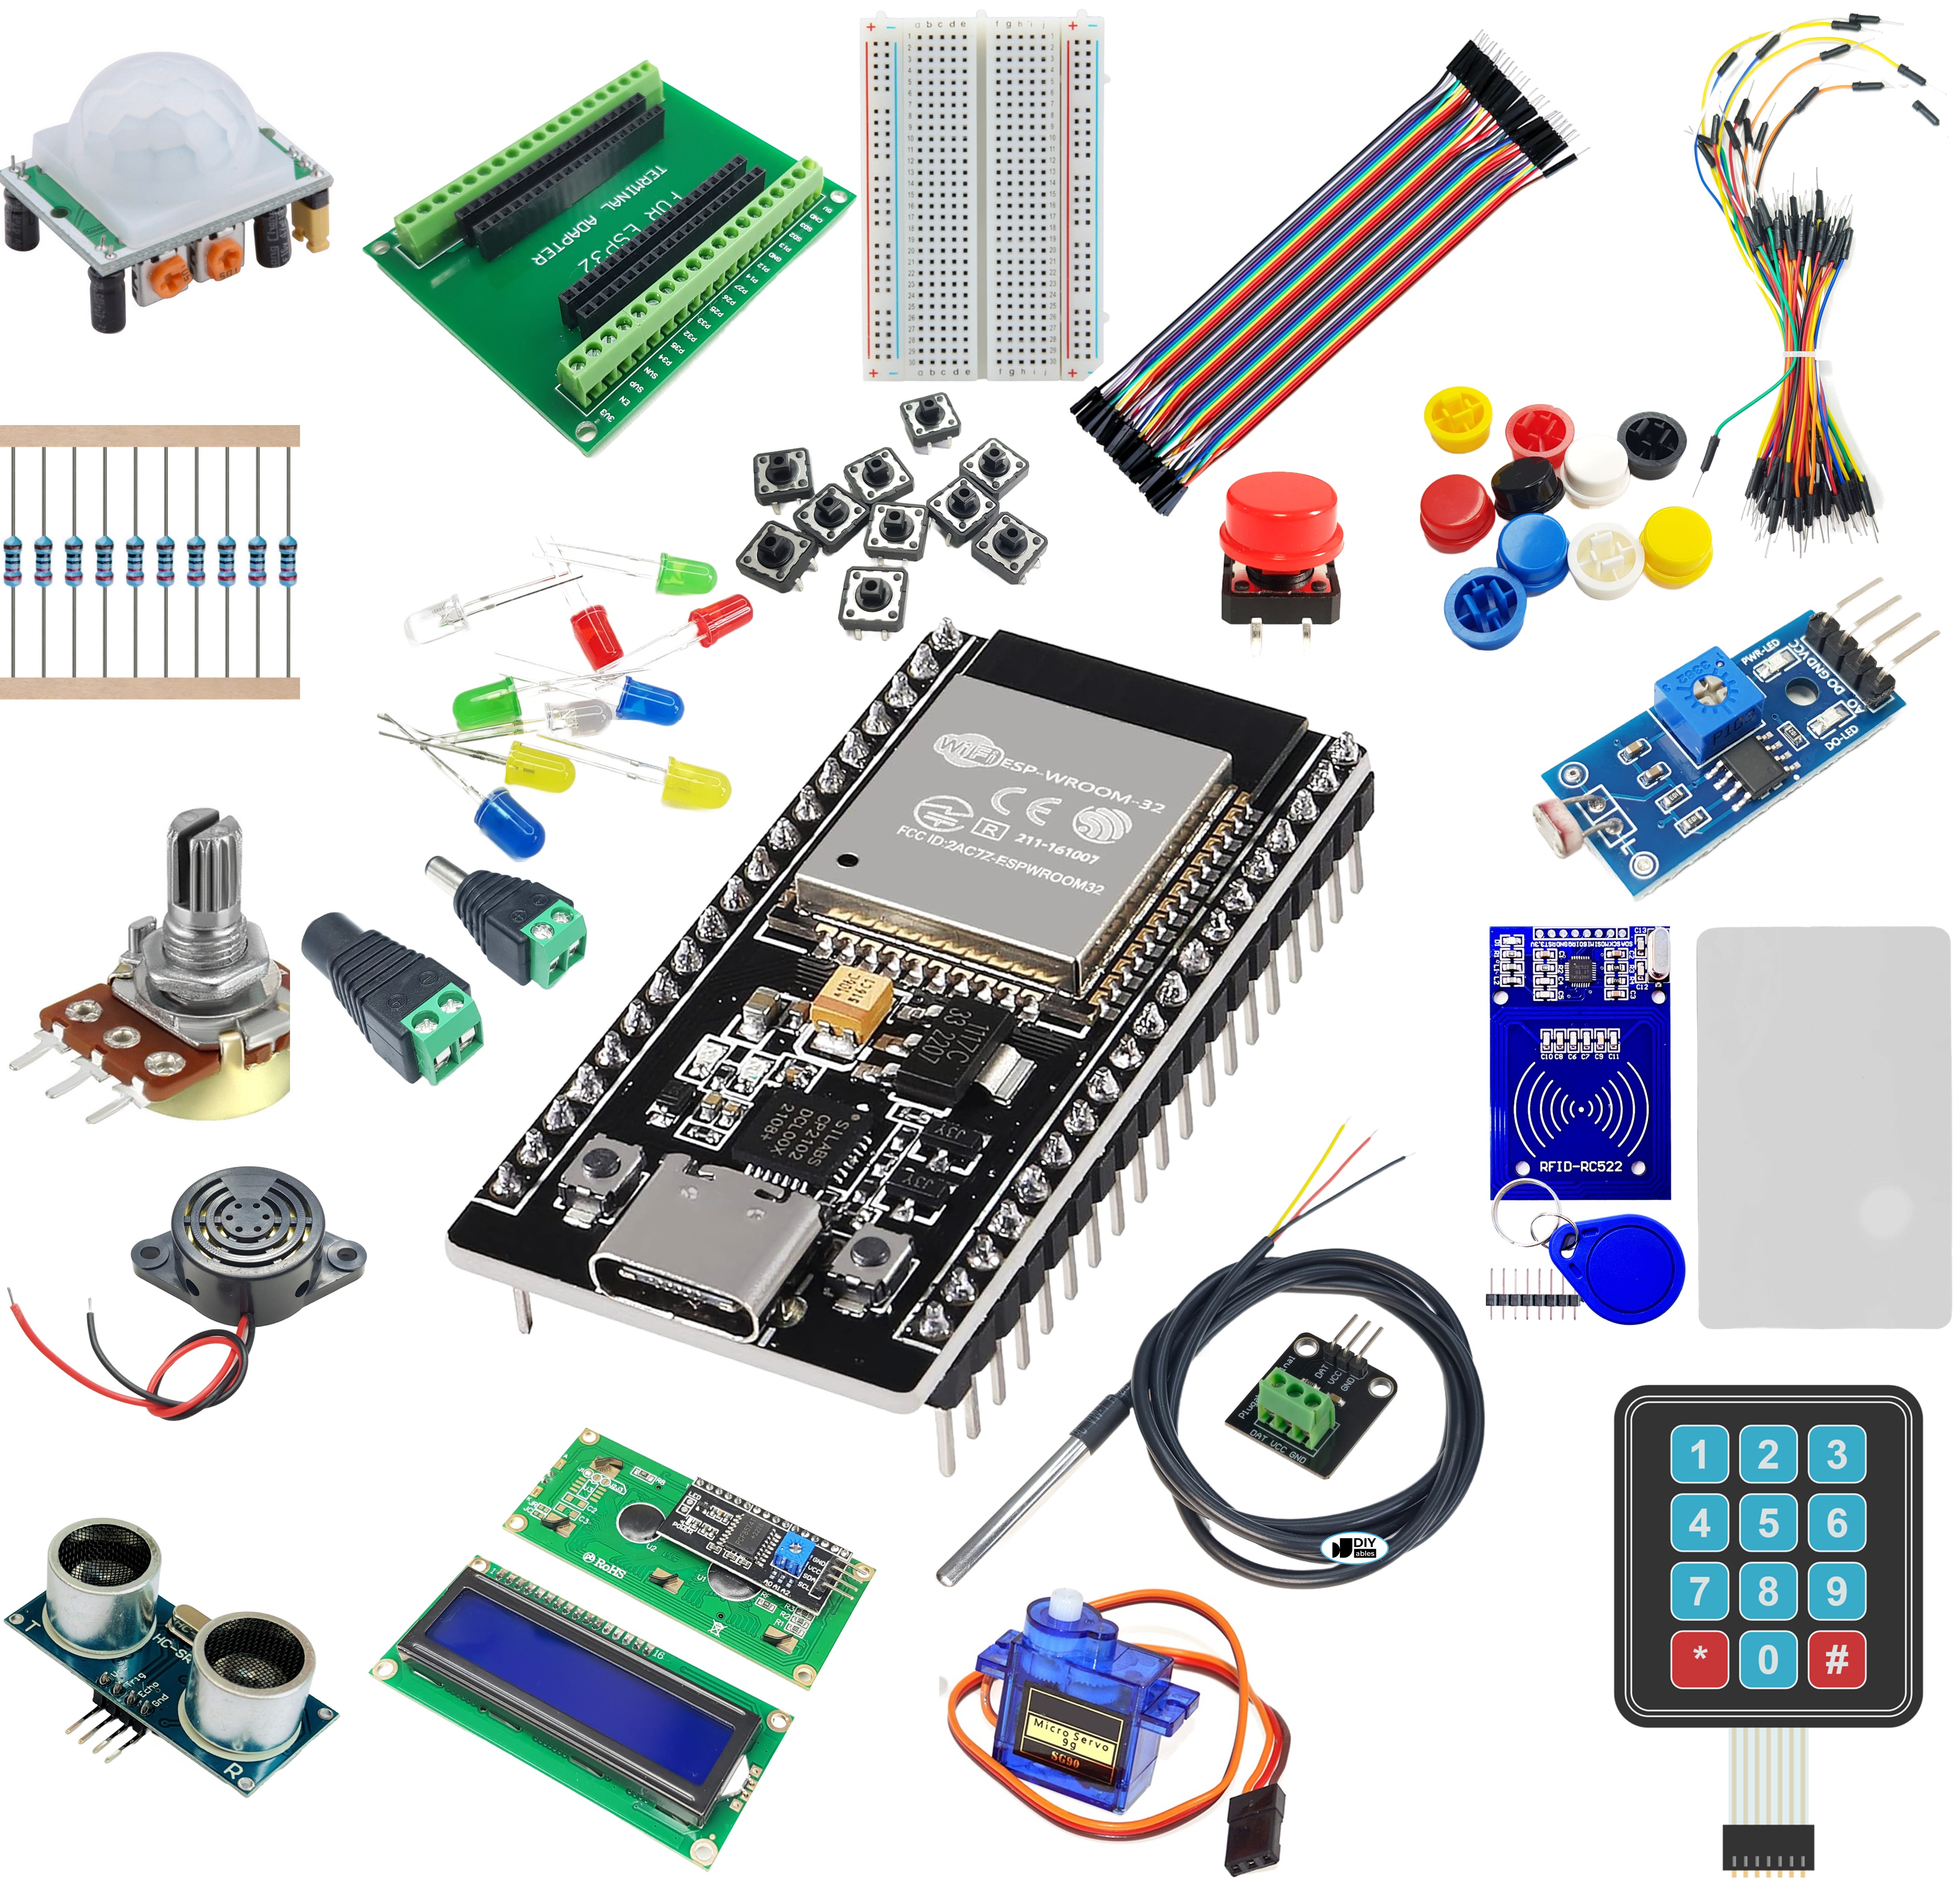

Quick Overview
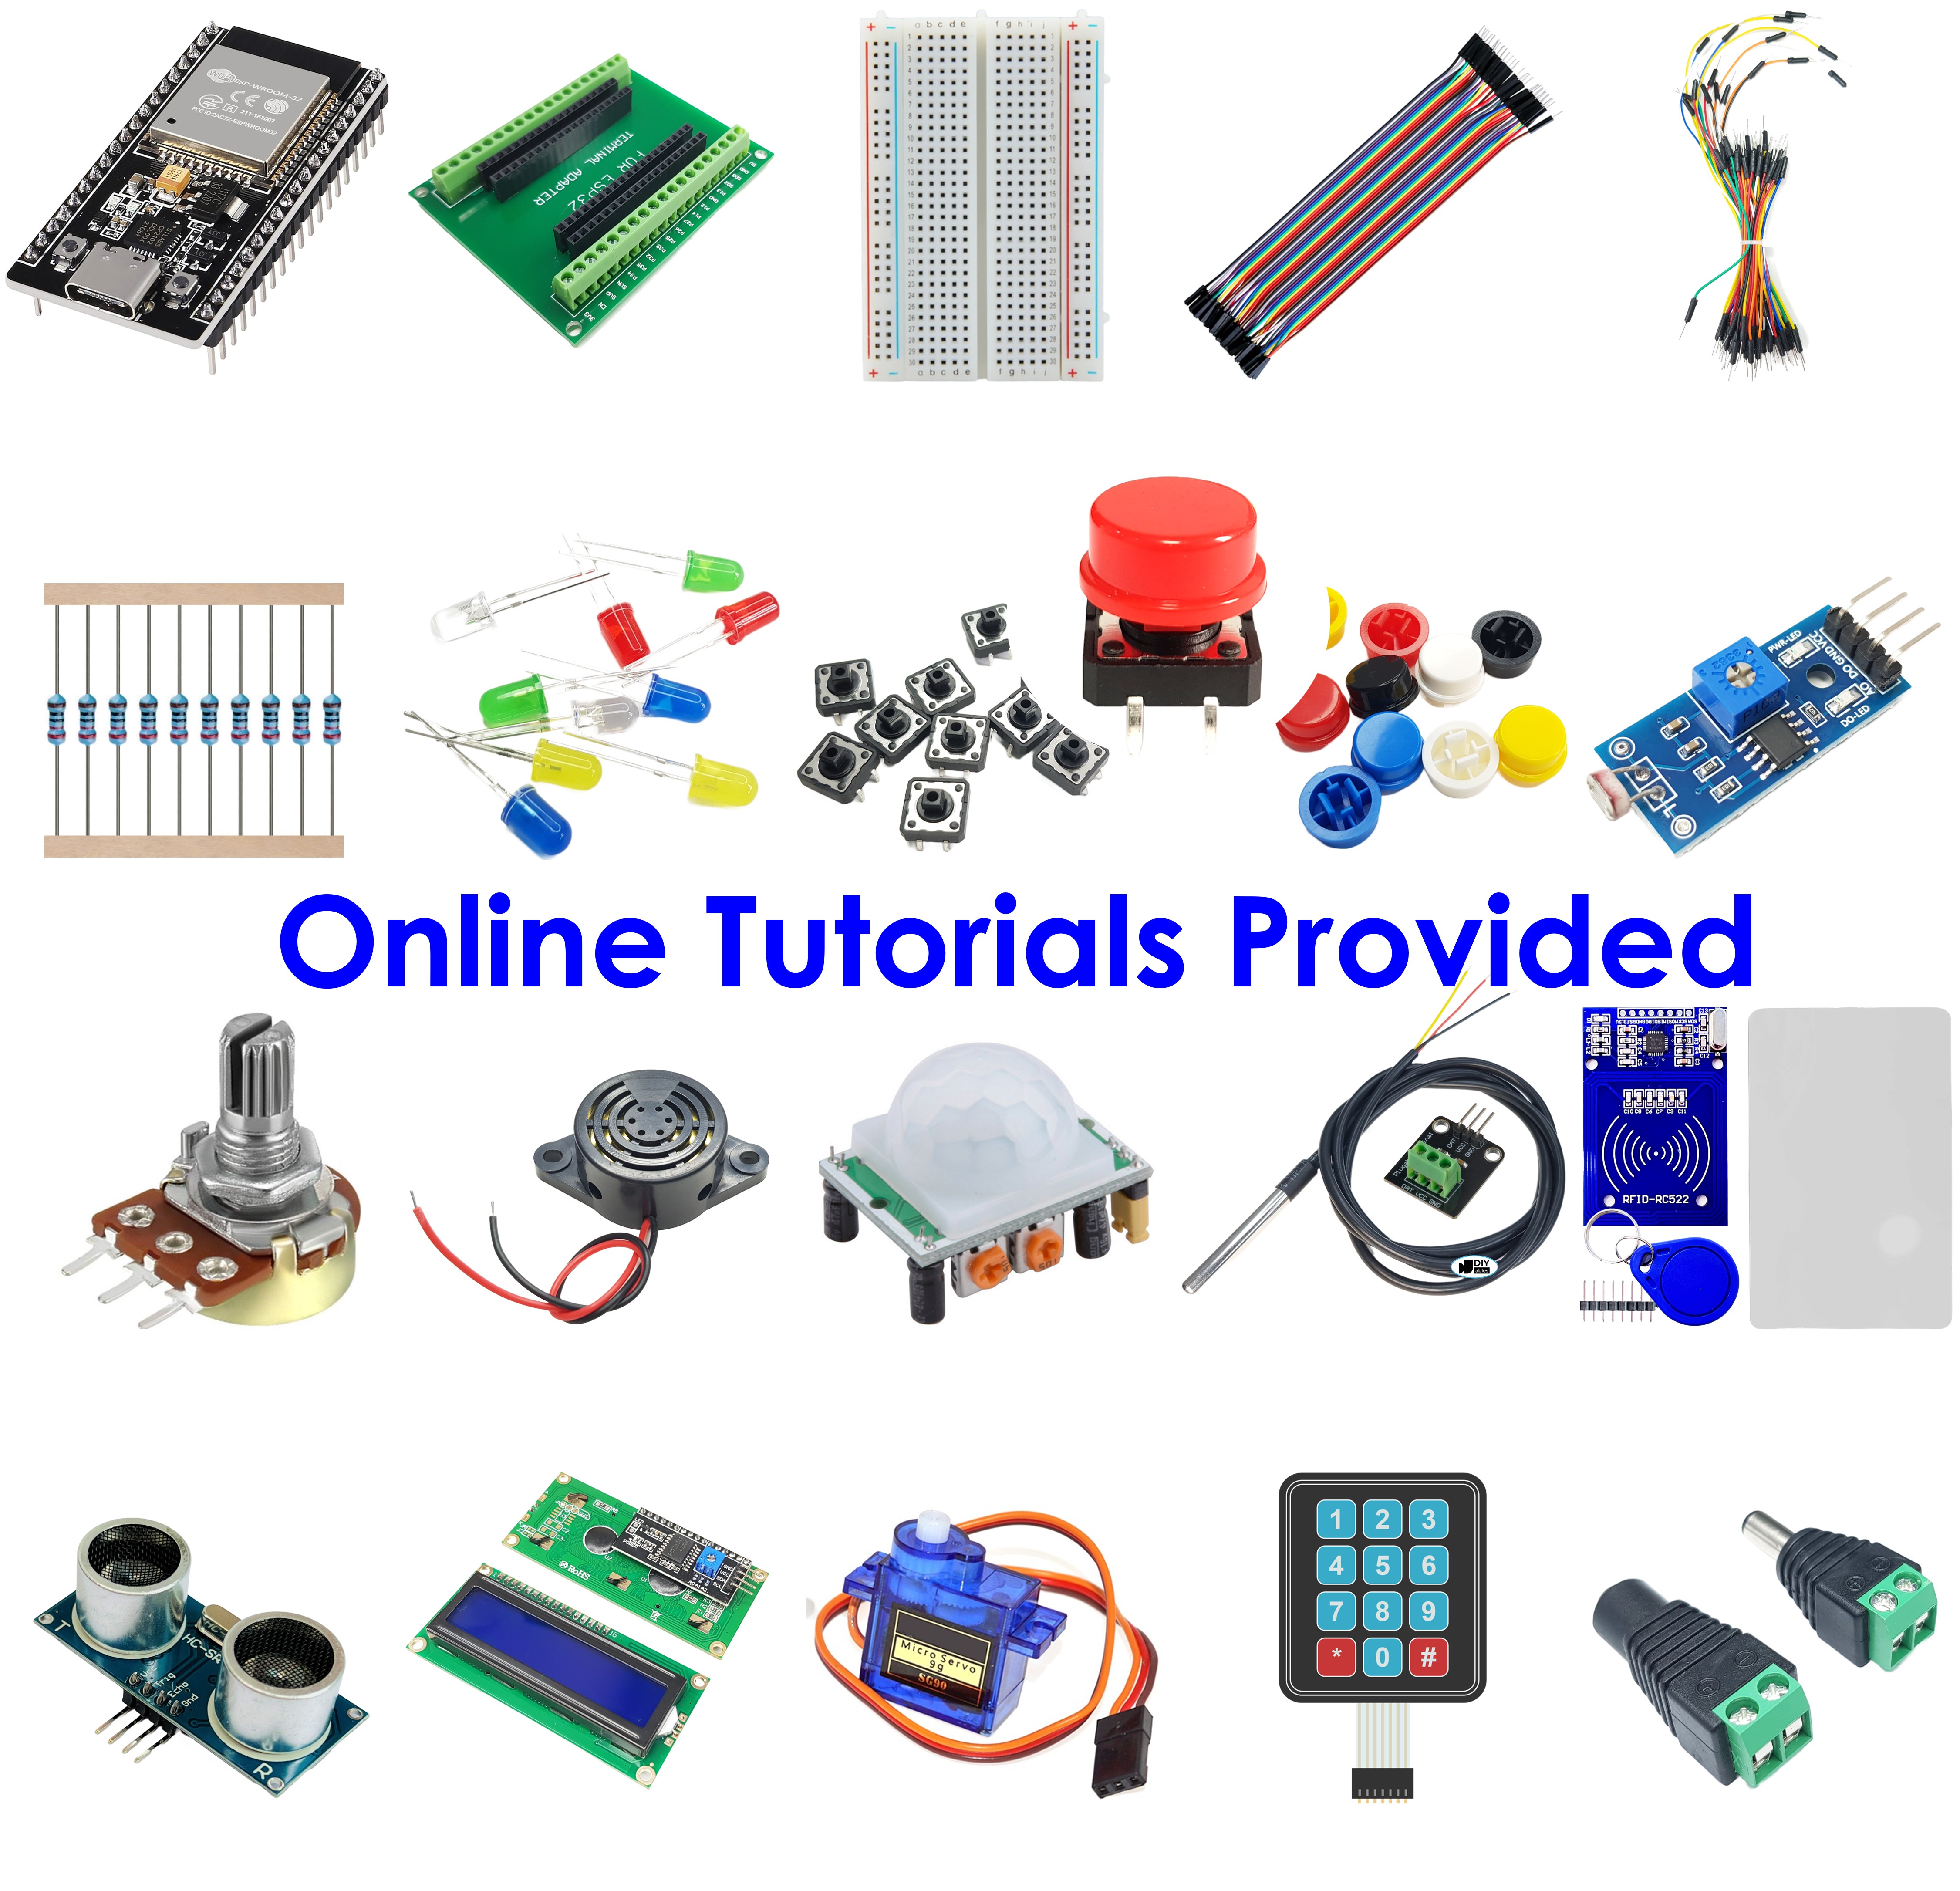
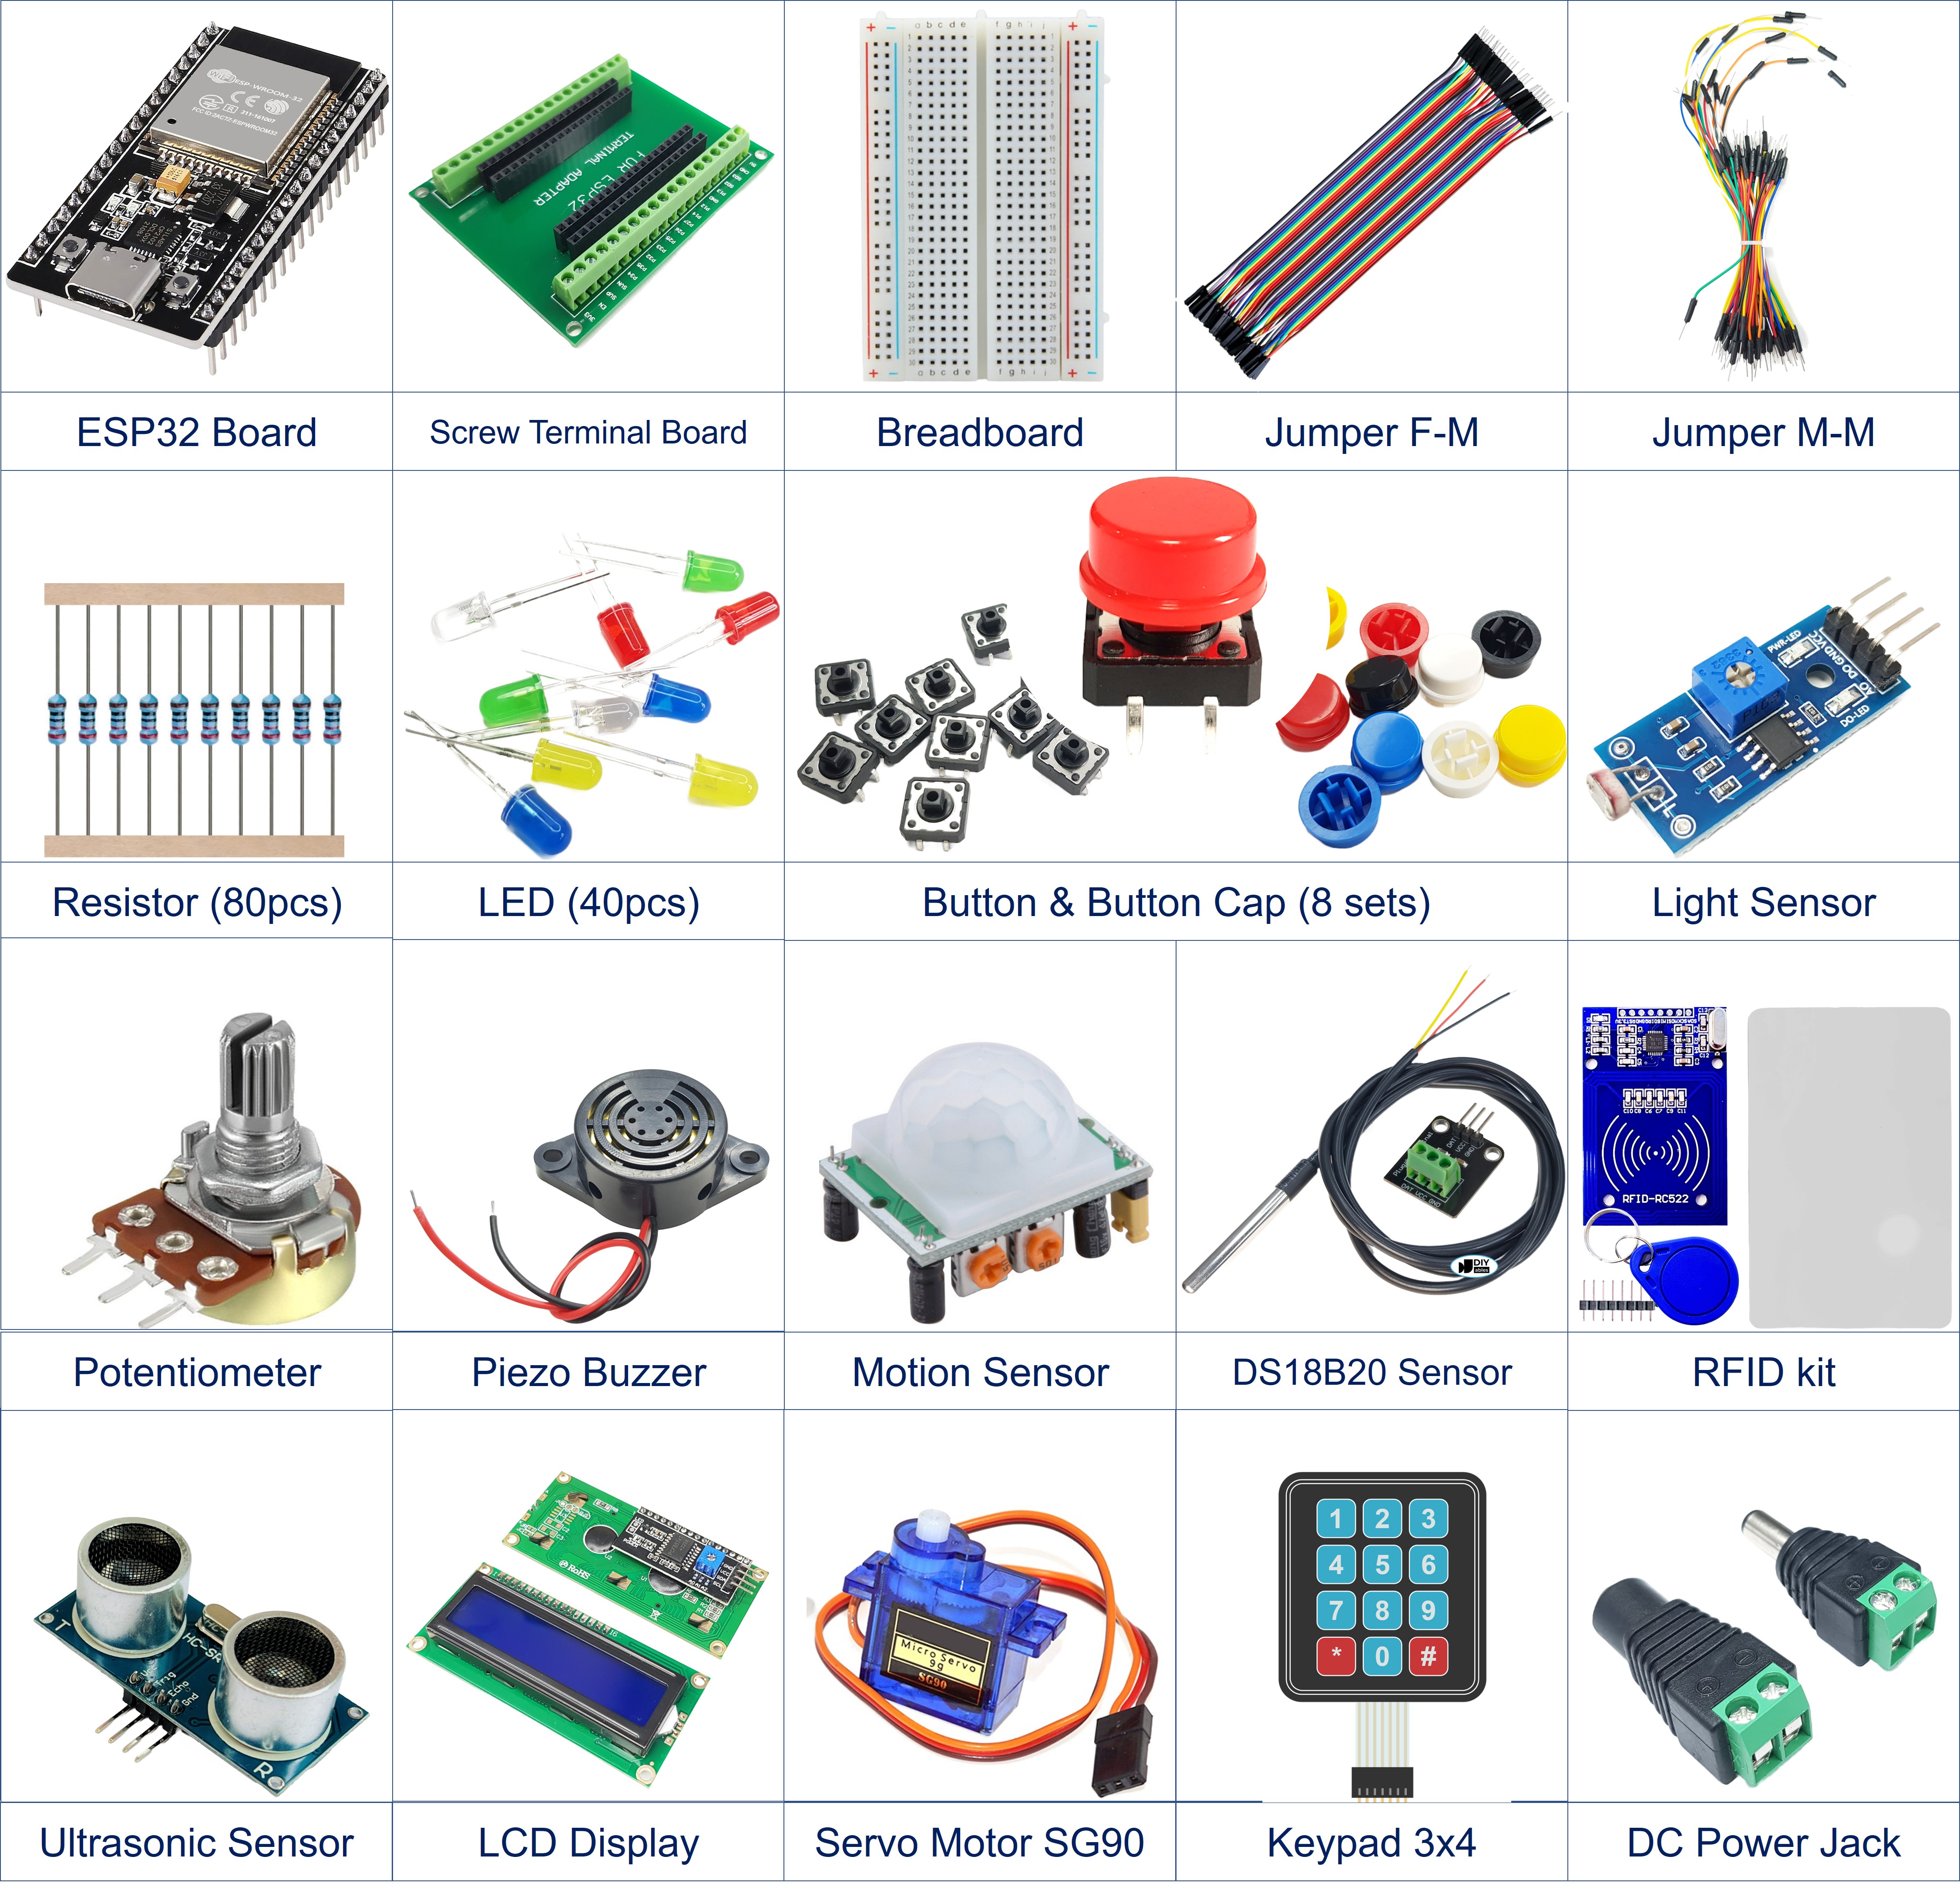
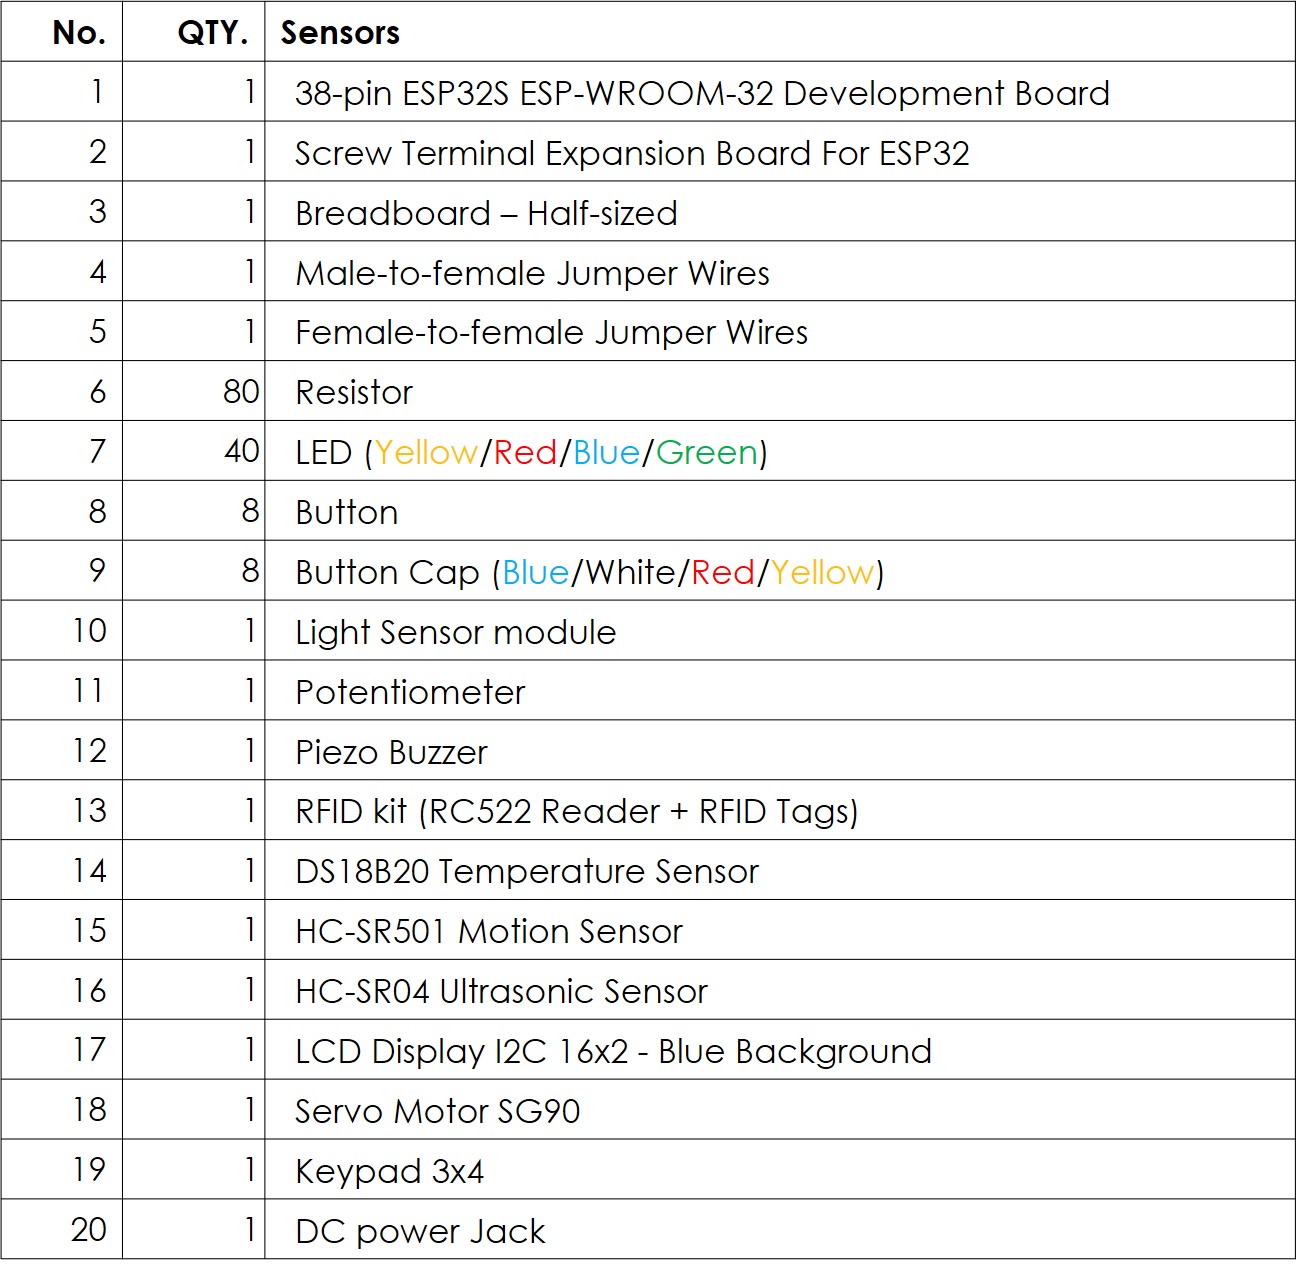
The DIYables ESP32 Starter Kit is a complete 20-in-1 electronics learning package for IoT development, wireless projects, and maker education. It features a 38-pin ESP32 development board with built-in WiFi and Bluetooth, dual-core processor, and CP2102 USB-to-serial chip for reliable connectivity.
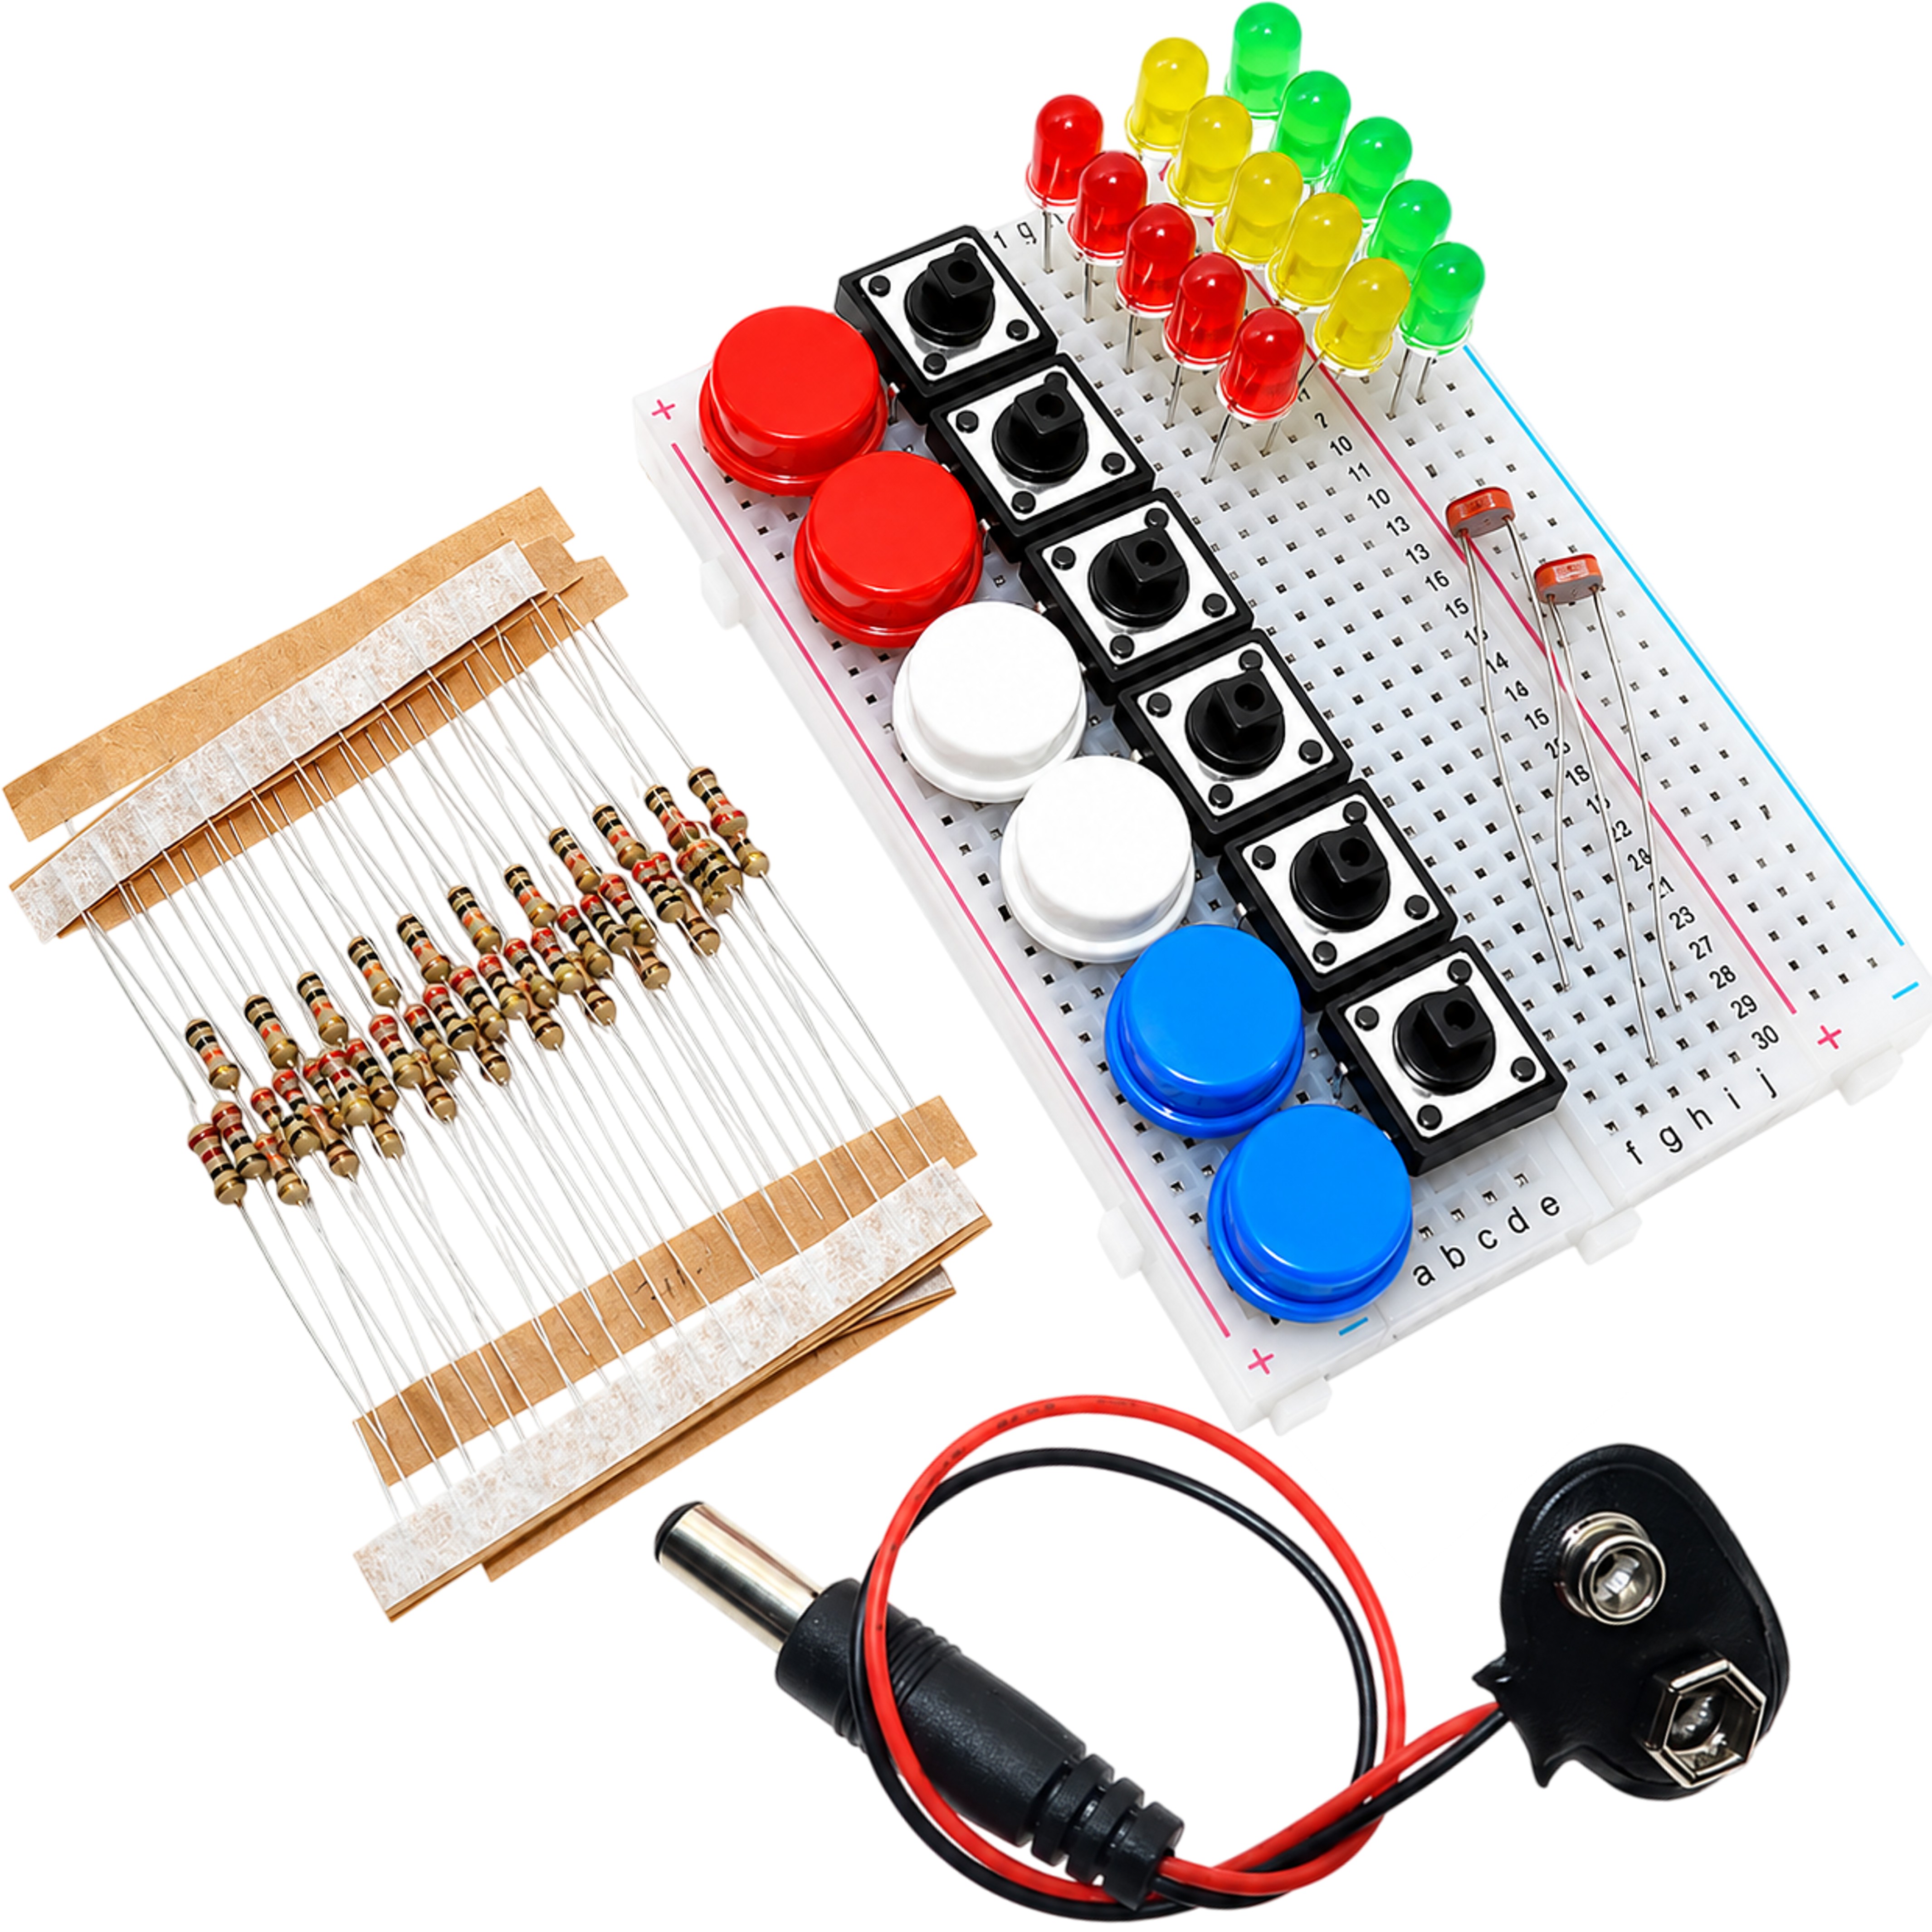
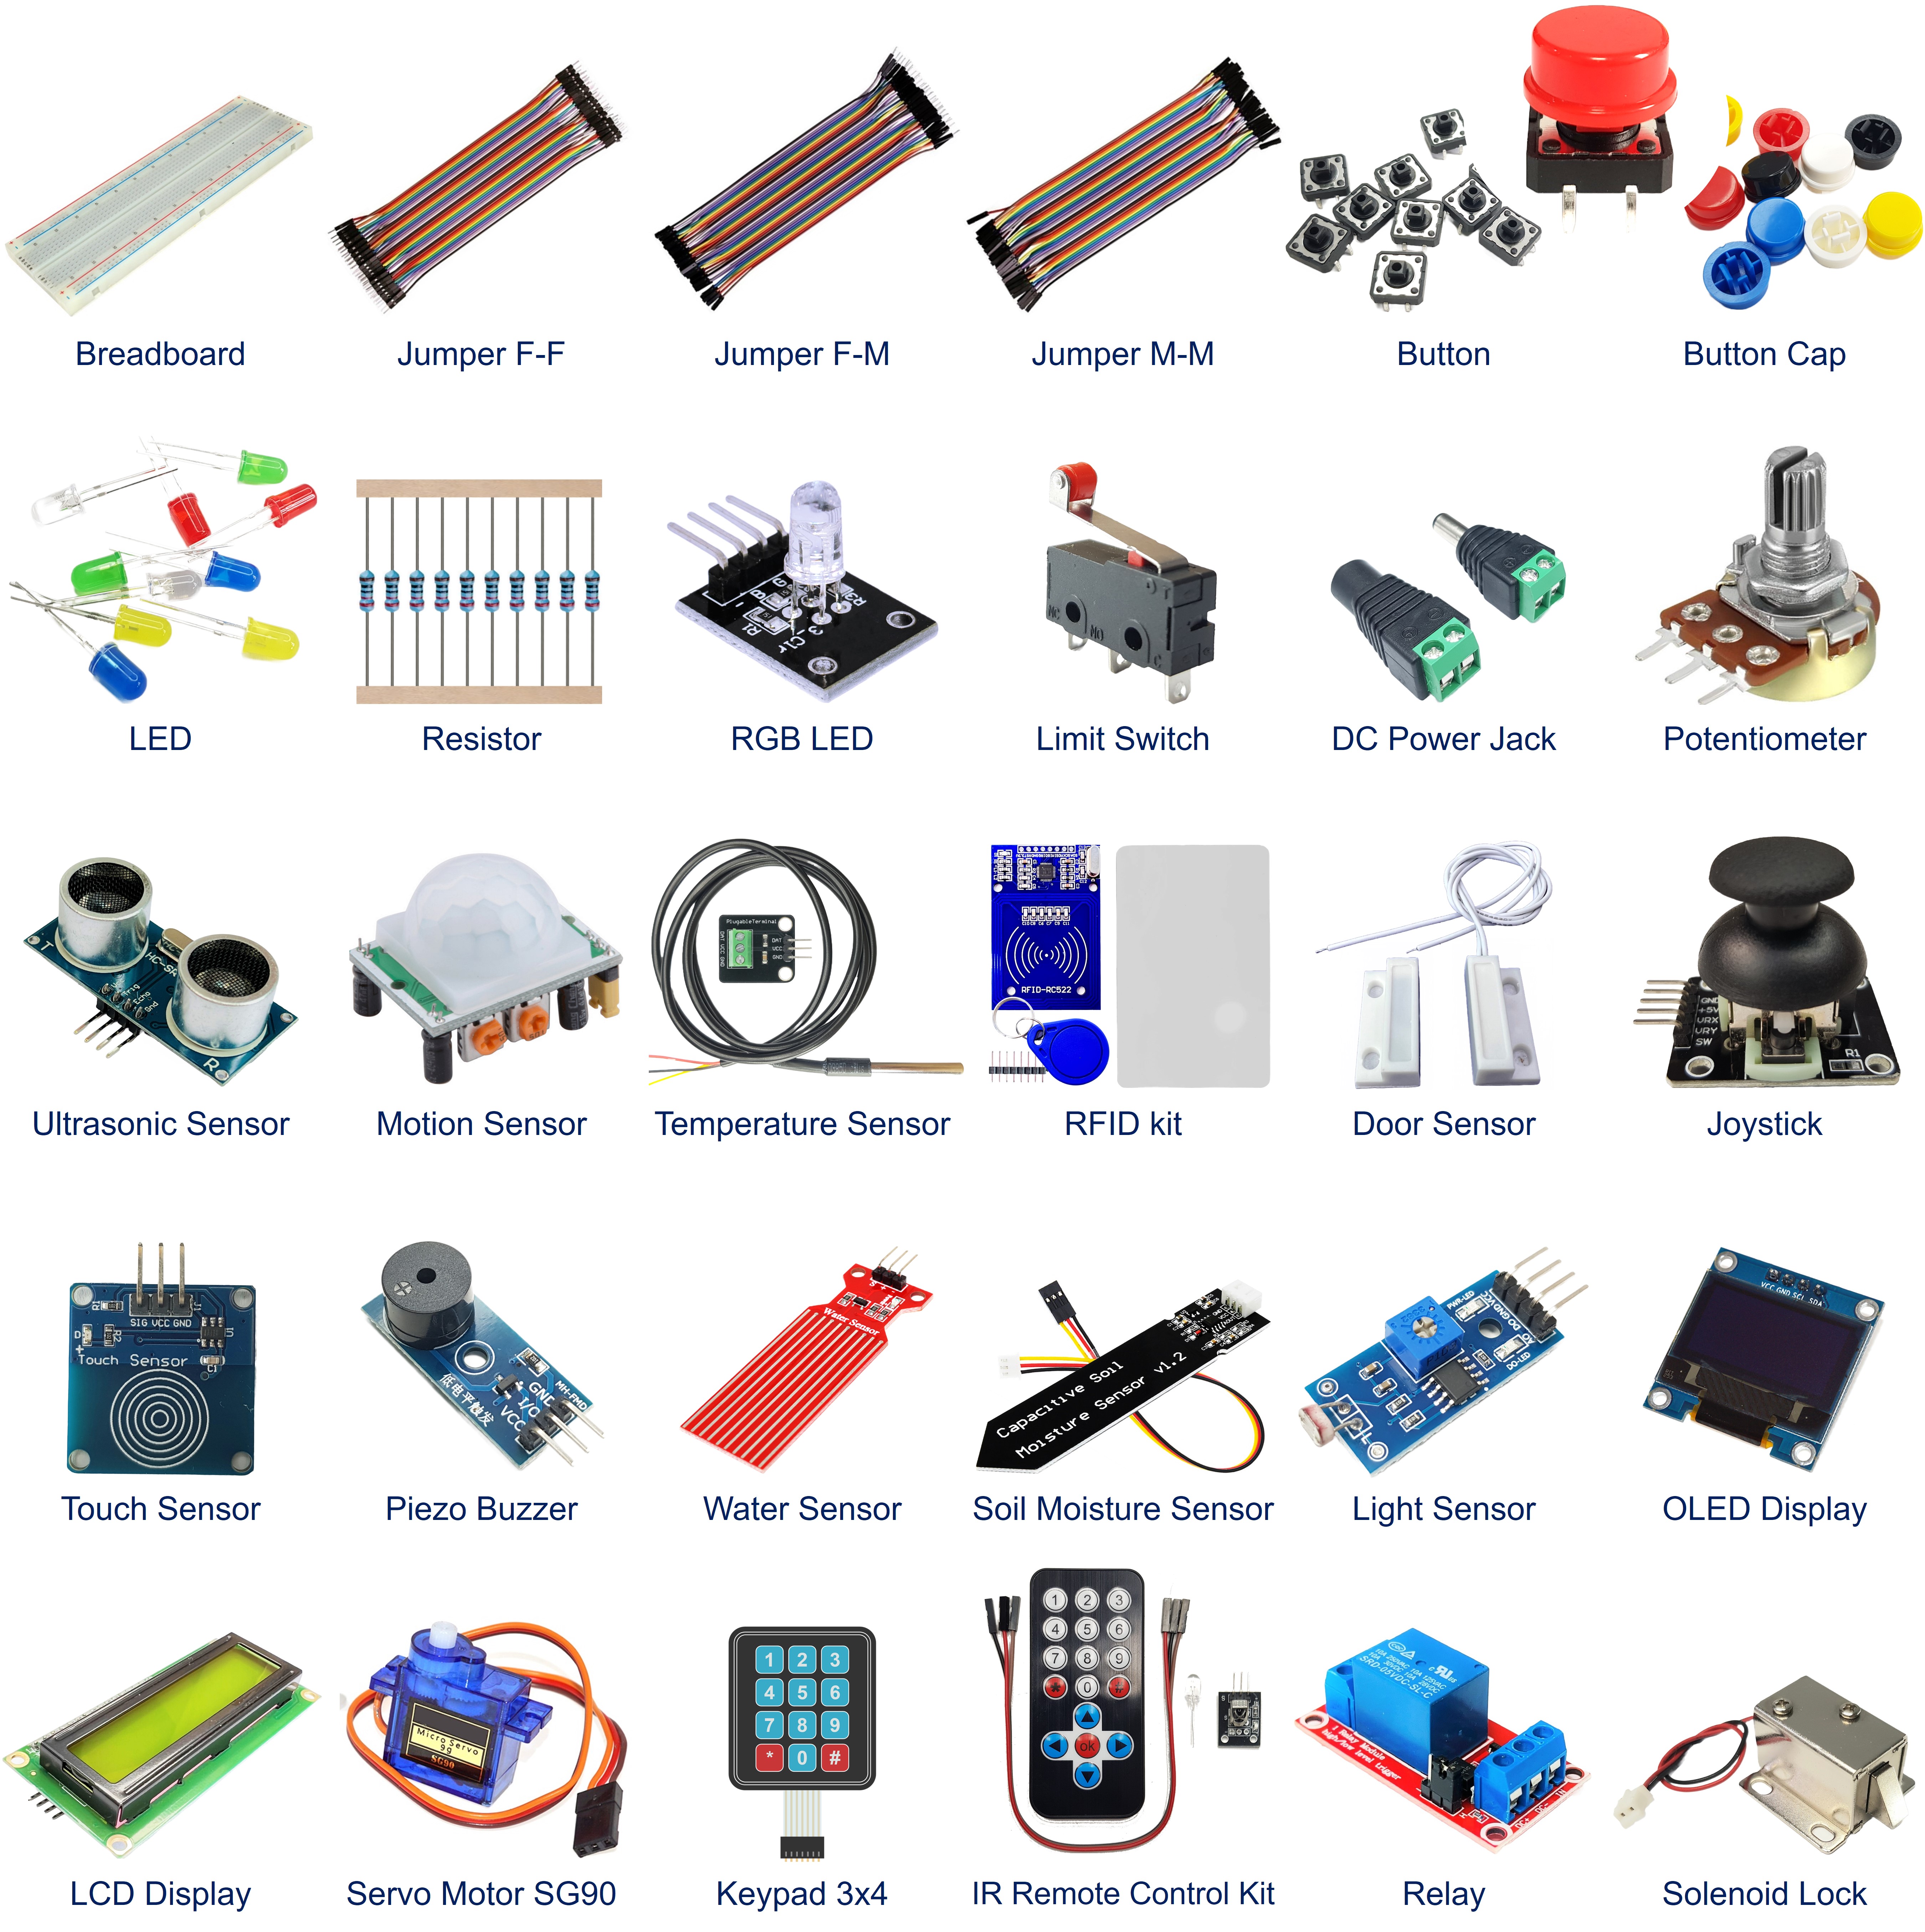
This comprehensive kit includes essential components: HC-SR501 motion sensor, HC-SR04 ultrasonic sensor, DS18B20 temperature sensor, LDR light sensor, 16x2 I2C LCD display, SG90 servo motor, 4x4 keypad, screw terminal expansion board, breadboard, jumper wires, buttons, LEDs, resistors, and more.
Perfect for learning both Arduino IDE (C/C++) and MicroPython programming. The kit provides hands-on experience with sensors, displays, motor control, and wireless communication. Online tutorials guide you through projects ranging from basic electronics to advanced IoT applications.
Key Features
- 20-in-1 Complete Kit — 38-pin ESP32 board with expansion board, sensors, display, and components
- WiFi and Bluetooth — Dual-core ESP32 with wireless connectivity for IoT projects
- CP2102 USB Interface — Reliable USB-to-serial connection for programming and power
- Essential Sensors — HC-SR501 motion, HC-SR04 ultrasonic, DS18B20 temperature, LDR light sensor
- Display and Actuators — 16x2 I2C LCD display, SG90 servo motor, piezo buzzer
- Input Devices — 4x4 matrix keypad, tactile buttons with caps, potentiometer
- Prototyping Tools — Half-size breadboard, male-to-female and female-to-female jumper wires
- Dual Programming Support — Arduino IDE (C/C++) and MicroPython tutorials available
- Screw Terminal Board — Expansion board for easy connections and prototyping
- Online Tutorials — Step-by-step guides for sensors, displays, and IoT projects
SPECIFICATION
| Specification | Value |
|---|---|
| Product Type | ESP32 Starter Kit / IoT Learning Kit |
| Development Board | 38-pin ESP32 (WiFi + Bluetooth) |
| Microcontroller | Dual-core Xtensa LX6 (up to 240 MHz) |
| Wireless Connectivity | WiFi 802.11 b/g/n, Bluetooth 4.2 and BLE |
| USB Interface | CP2102 USB-to-serial chip |
| Sensors Included | HC-SR501 (motion), HC-SR04 (ultrasonic), DS18B20 (temp), LDR |
| Display Module | 16x2 I2C LCD display |
| Actuators | SG90 servo motor, piezo buzzer |
| Input Devices | 4x4 matrix keypad, tactile buttons with caps, potentiometer |
| Expansion Board | Screw terminal expansion board |
| Prototyping Tools | Half-size breadboard, male-to-female and female-to-female jumper wires |
| Components Included | LEDs, resistors, and other essential electronics |
| Programming Support | Arduino IDE (C/C++), MicroPython |
| Tutorials Available | Online step-by-step guides for both programming environments |
| Quantity | 20 components |
COMPATIBLE HARDWARE
- Arduino IDE (Windows, Mac, Linux) — Select "ESP32 Dev Module" as board
- MicroPython firmware — Full support for ESP32 platform
- CP2102 USB cable (included with board) — For programming and power
- 3.3V and 5V shields and modules compatible with ESP32 GPIO
- External power supply — 5V via USB or VIN pin
- ESP32 libraries for WiFi, Bluetooth, sensors, and displays
DRIVER INSTALLATION
The Arduino IDE typically supports the driver for the ESP32 board in this starter kit automatically. However, in some cases, the Arduino IDE fails to recognize the board, follow these steps to manually install the driver.
- Download the Driver: Obtain the CP210x driver from one of these links:
Unzip the downloaded file to a folder on your computer. Note that the package does not include an installation executable.
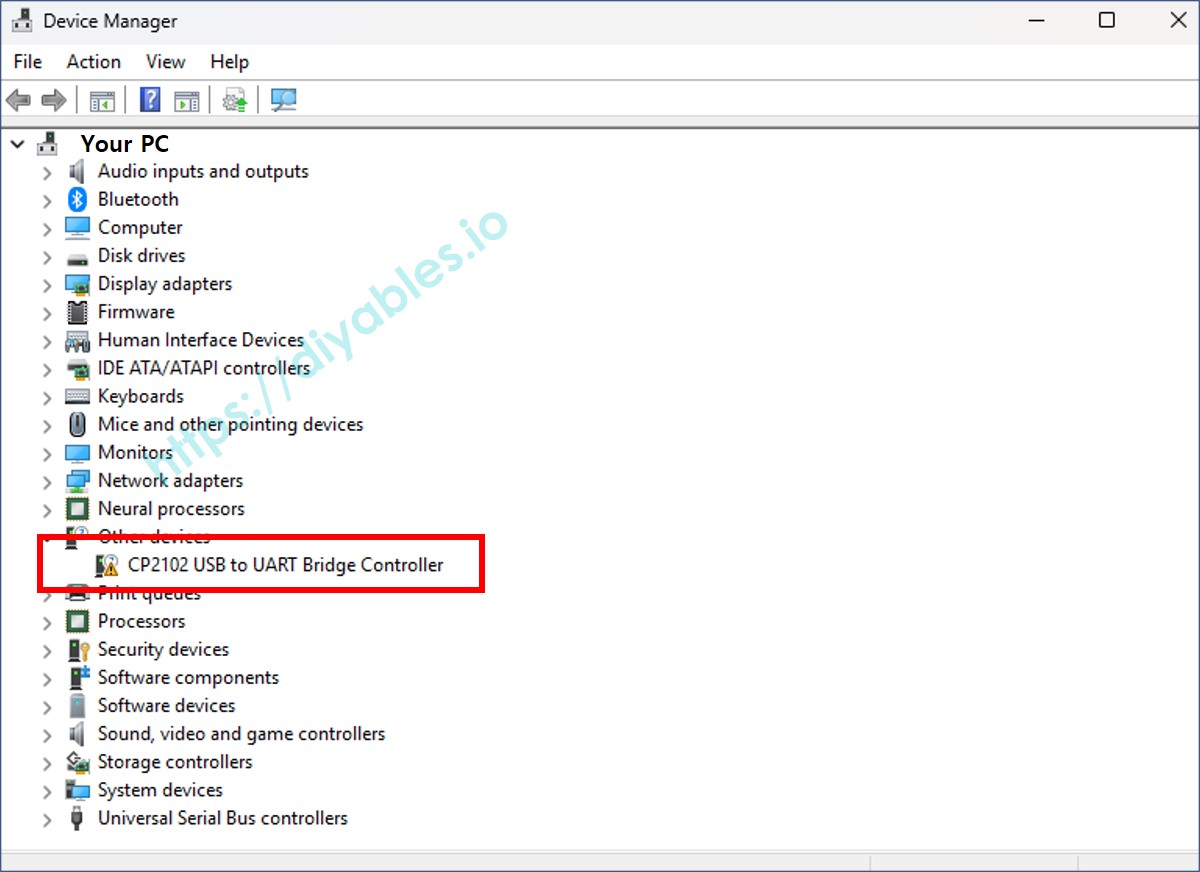
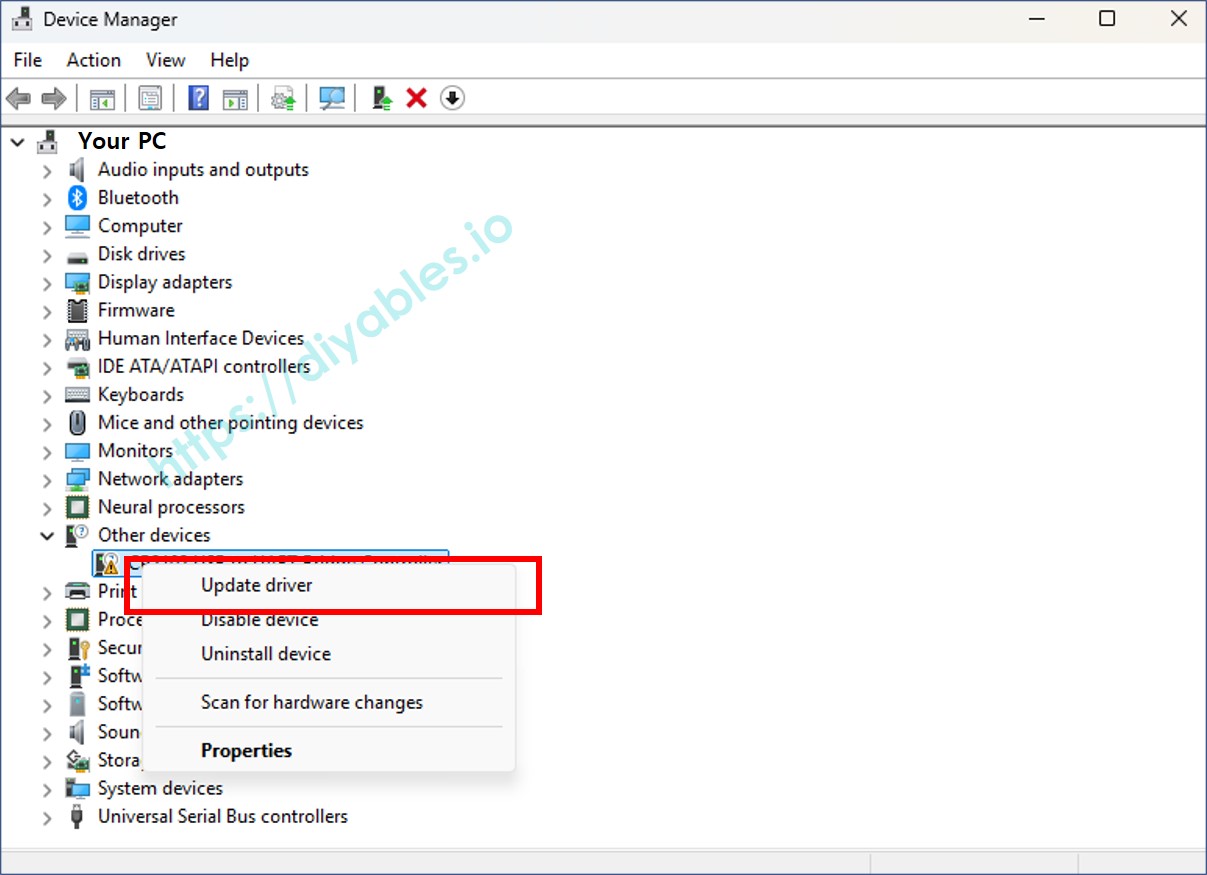
- Access Device Manager
- Press Windows + X and choose Device Manager, or search for "Device Manager" in the Start menu.
- Look for the device under Ports (COM & LPT), typically listed as USB Serial Port or similar.
- Plug your ESP32 board into your computer using a USB cable.
- Monitor the Ports (COM & LPT) section in Device Manager to identify the new serial port that appears. This is your ESP32 device.
- Update the Driver
- Right-click the detected serial device (e.g., “USB Serial Port”) and select Update driver.
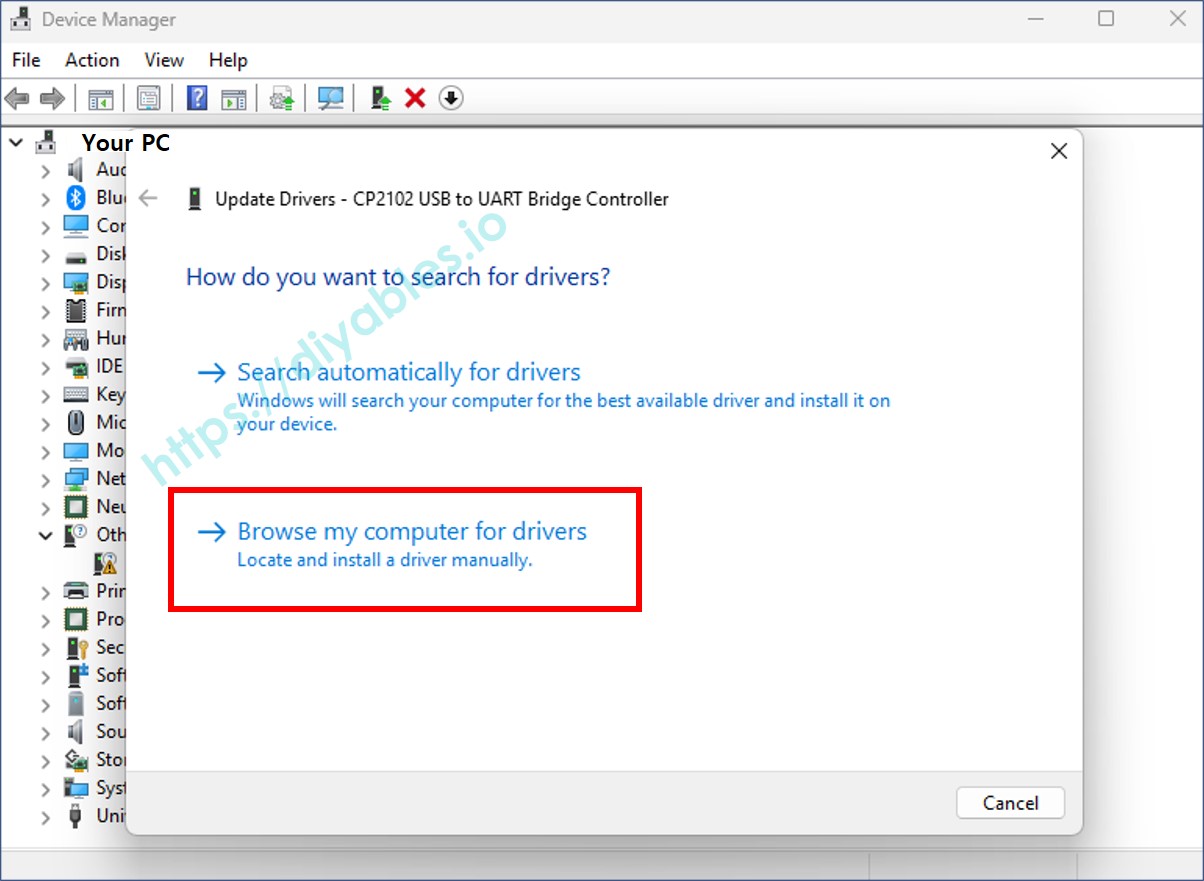
- Choose Browse my computer for drivers in the pop-up window.
- Locate the Unzipped Folder
- Click Browse, navigate to the folder containing the unzipped driver, and select it.
- Click Next and follow the on-screen instructions to complete the installation.
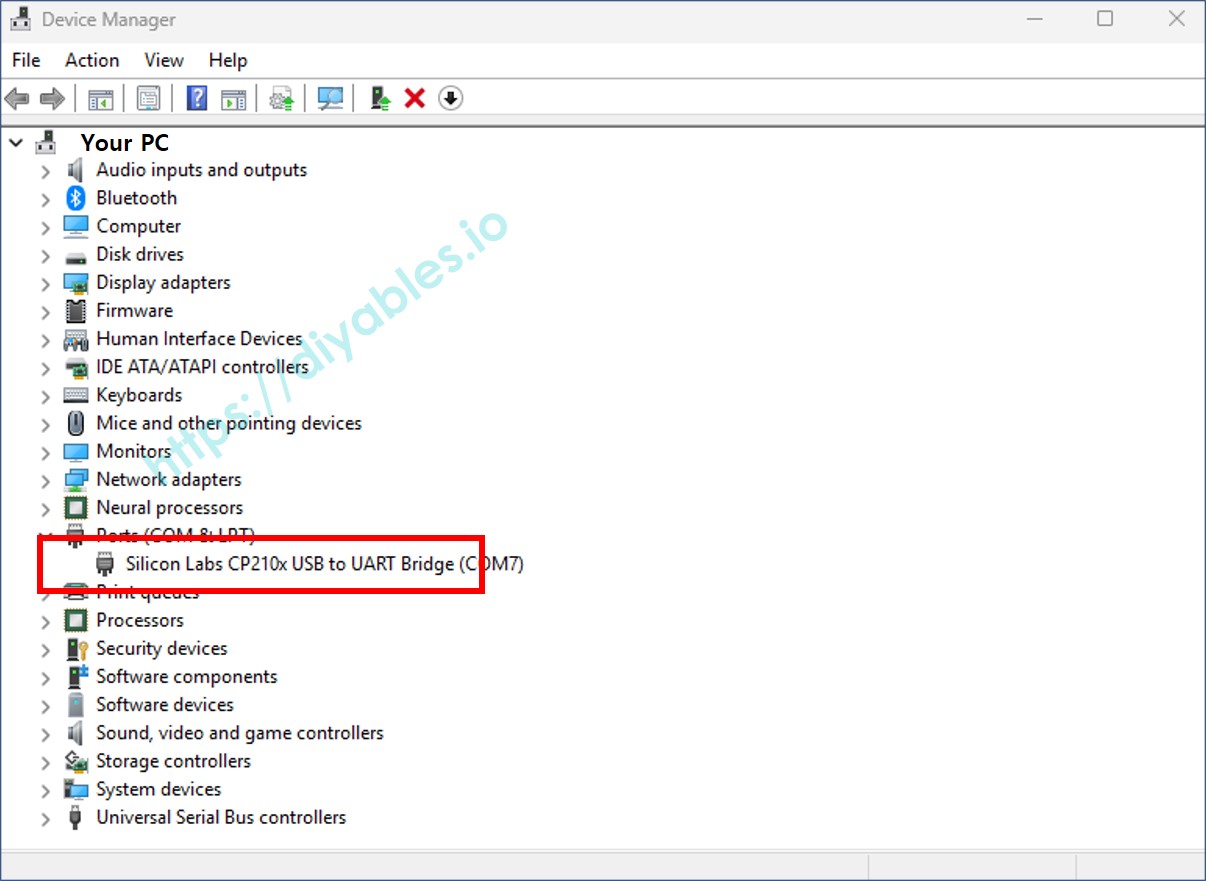
- Complete the Installation
After installation, the device should appear correctly under Ports (COM & LPT) in Device Manager, as shown below:
Note: If the driver installation fails, uninstall the existing driver for the COM port before repeating the steps above.
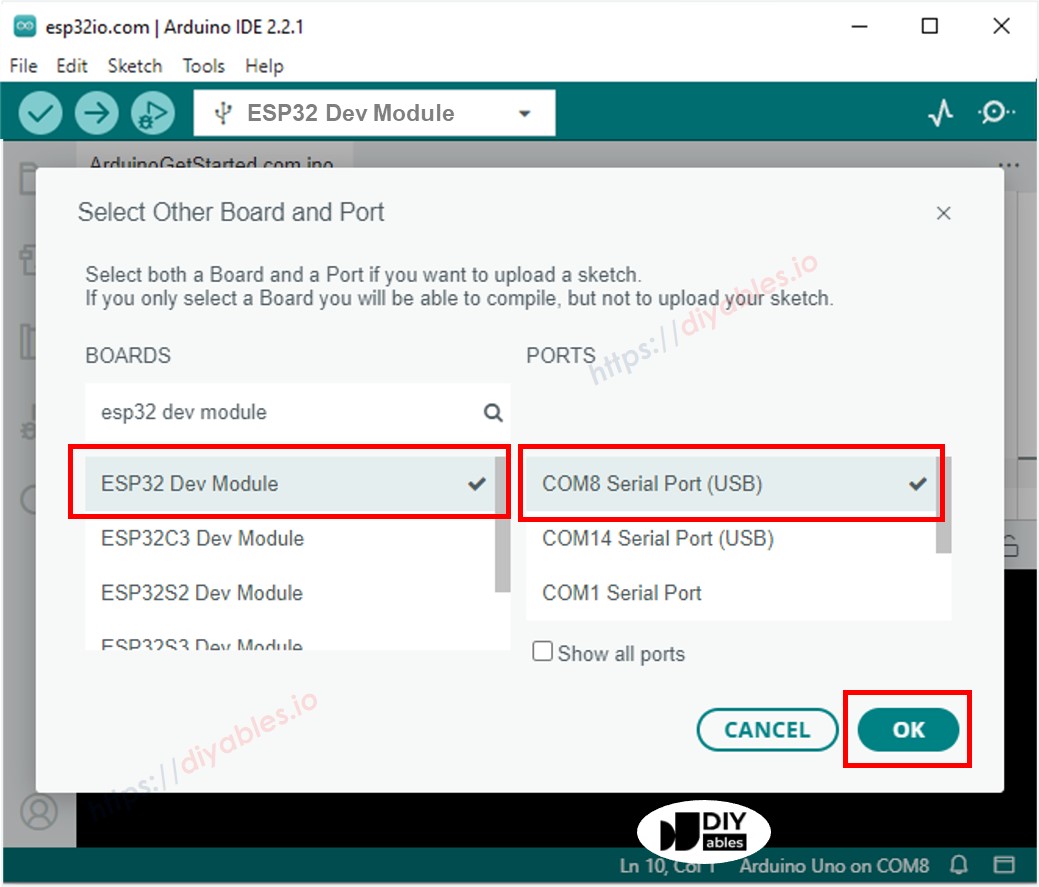
ARDUINO IDE BOARD SELECTION
- Connect the DIYables ESP32 board to your computer via a USB cable.
- Open the Arduino IDE.
- Select the ESP32 Dev Module and the appropriate COM port.